Real-Time Data Transmission in Laravel using Pusher: Step-by-Step Guide and Examples

Real-Time Data Transmission in Laravel using Pusher: Step-by-Step Guide and Examples

08-Nov-2023
| |
Image Carousel

Hello developers in this tutorial we will discuss about how to send real time data using laraevel with pusher

Table of Contents

S.no Contents-topics
1 What is Pusher
2 Install package
3 Setup .env 
4 Create and setup broadcasting event
5 Setup view file
6 Create new Event from controller and Send dynamic data and Broadcasting Events
7 Setup routes.php
8 Sending data from Pusher

1:What is Pusher

Pusher  is basically a hosted service provider that provides us to send or add real time data to our web and native applications. Pusher gives the power to your applications for sending realtime data

2:Install package

For installing the package we just need to add the below command in the terminal
code for pusher package : 
Copy

composer require pusher/pusher-php-server

3:Setup .env

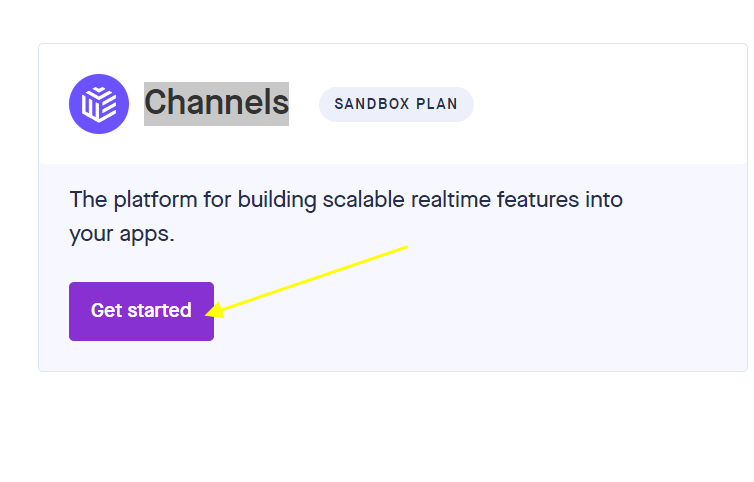
After creating an account from Pusher.com 
After creating account on pusher just click on channel section and get started


After that just enter some details and click on create App

Now you can also see diffrent steps for creating or you may follow steps given below.

Click on App Keys and you will find your application keys , just put the keys in .env and also change BROADCAST_DRIVER=pusher and make sure to change PUSHER_APP_CLUSTER according to you app location from pusher
Copy for .env codeCopy

BROADCAST_DRIVER=pusher
PUSHER_APP_ID=XXXXXX
PUSHER_APP_KEY=XXXXXXXXX
PUSHER_APP_SECRET=XXXXXXXX
PUSHER_HOST=
PUSHER_PORT=443
PUSHER_SCHEME=https
PUSHER_APP_CLUSTER=ap2

4:Create and setup broadcasting event

For creating event paste the following command 
code for event 
Copy

php artisan make:event SendNotification

 Inside app/Events/SendNotification.php paste the following code
code for SendNotification.php  
Copy

<?php
 
namespace App\Events;
 
use Illuminate\Broadcasting\Channel;
use Illuminate\Broadcasting\InteractsWithSockets;
use Illuminate\Broadcasting\PresenceChannel;
use Illuminate\Broadcasting\PrivateChannel;
use Illuminate\Contracts\Broadcasting\ShouldBroadcast;
use Illuminate\Foundation\Events\Dispatchable;
use Illuminate\Queue\SerializesModels;
 
class SendNotification implements ShouldBroadcast
{
    use Dispatchable, InteractsWithSockets, SerializesModels;
 
    /**
     * Create a new event instance.
     */
    public $data;
    public $channel;
    public $event;
 
  public function __construct($data ,$channel , $event )
  {
      $this->data = $data;
      $this->channel = $channel;
      $this->event = $event;
  }
 
  public function broadcastOn()
  {
      return [$this->channel];
  }
 
  public function broadcastAs()
  {
      return $this->event;
  }
}
 

5:Create view blade

create a view file inside resources/views/pusher.blade.php and copy the code given below and replace the AppKey with your AppKey
pusher.blade.php:
  Copy

<!DOCTYPE html>
<head>
  <title>Pusher Test</title>
  <script src="https://js.pusher.com/7.2/pusher.min.js"></script>
  <script>
 
    // Enable pusher logging - don't include this in production
    Pusher.logToConsole = true;
 
    var pusher = new Pusher('AppKey', {
      cluster: 'ap2'
    });
 
    var channel = pusher.subscribe('my-channel');
    channel.bind('my-event', function(data) {
        alert(data.data.name);
        alert(data.data.subscribe_to);
    //   alert(JSON.stringify(data));
      console.log(data);
    });
  </script>
</head>
<body>
  <h1>Pusher Test</h1>
  <p>
    Try publishing an event to channel <code>my-channel</code>
    with event name <code>my-event</code>.
  </p>
</body>

 6:Create new Event from controller and Send dynamic data and Broadcasting Events

 Now for setting controller create a controller PusherController
code Copy

<?php
 
namespace App\Http\Controllers;
 
use App\Events\SendNotification;
 
class PusherController extends Controller
{
 
  public function sendPusher()
  {
    $data = ['name'=>'DeveloperCodez','subscribe_to'=>'CodeWithVineetMaanas'];
    event(new SendNotification($data,'my-channel','my-event'));
  }
}

7:Setup routes.php

Building new routes for data from Pusher
code : 
Copy

<?php
use Illuminate\Support\Facades\Route;
use App\Http\Controllers\PusherController;
/*
|--------------------------------------------------------------------------
| Web Routes
|--------------------------------------------------------------------------
|
| Here is where you can register web routes for your application. These
| routes are loaded by the RouteServiceProvider within a group which
| contains the "web" middleware group. Now create something great!
|
*/
Route::get('sendPusher', [PusherController::class, 'sendPusher']);

8:Sending data from Pusher

php artisan serve
http://127.0.0.1:8000/sendPusher


Tags: Pusher API integration in Laravel for real-time data. , aravel and Pusher for real-time communication ,Real-time updates in Laravel using Pusher , Broadcasting with Pusher in Laravel , Pusher Laravel tutorial,laravel , php ,laravel-php , mvc laravel, advance laravel , bugs in laravel , laravel advance level,
0 Comments (Please let us know your query)
Leave Comment
Leave Comment
Articles from other Categories
Load More

Newsletter