Jobs in Laravel 9 , Jobs-Queues in Laravel 9

Table of Contents
| S.no | Contents-topics |
|---|---|
| 1 | Introduction of job-queues |
| 2 | Controller function for creating data |
| 3 | Configuration for job-queues |
| 4 | Making job-queues |
| 5 | Call the job-queues |
1:Introduction of job-queues
Jobs-queues is the one of best feature of laravel , to do work in the background while performing front actions, like if you have 100 emails to hit in the morning and performing particular functions , jobs-queues is the best optin to perform this action. It actually create a jobs table in database and work accordingly.Like wise if you have some payment payout system in your system which work on some cron job then job-queues is the option to perform such actions.
Taking a basic example of updating the databae with 100 users , calling from web.php to any controller to perform function.
2:Controller function for creating data
web.php code. Copy
In Controller we are just creation some data to perform jobs in laravel
code: Copy

3:Configuration for job-queues
As 100 reocrds has been created , now we will create jobs table in database which stores jobs and process them one by one with FCFS( first come first serve).
command for table :Copy
Also read:HOW TO CREATE COMPONENTS IN LARAVEL 9
It will create migration file and then we have to create this migration in our database
command for migartion Copy
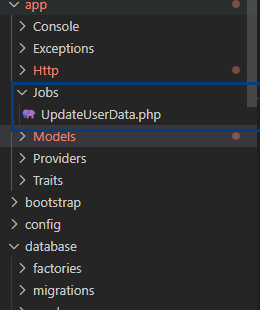
4:Making job-queues
This will create Jobs table in database
Now we will create our new job with name UpdateUserData
command for job: Copy
Also read:HOW TO MAKE TRAITS IN LARAVEL 9
Now for the testing the jobs in laravel we will change the name of the users in App\Jobs\UpdateUserData with the help of jobs , paste the following code in app/Jobs/UpdateUserData to update the user data and see the changes Copy
in .env file make QUEUE_CONNECTION=sync to QUEUE_CONNECTION=database
.env Copy
Now from controller we call this UpdateUserData job by using UpdateUserData::dispatch() method
code: Copy
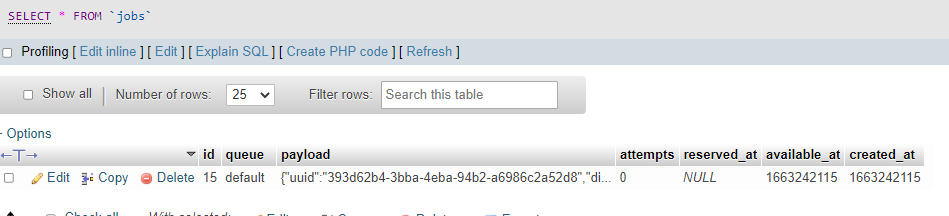
Now you will see an entry in jobs table.
5:Calling the job-queues
Now hit following command in your terminal
command:Copy
This will take the data from jobs database and perform the corresponding functions in a queue.
If you change the functionality of your job then hit this command
command for restart: Copy
php artisan queue:restartagain php artisan queue:work
if you want to make terminal work in the backgroud after you closes your console or terminal use this
Copy
nohup php artisan queue:work &Note : On live servers sometimes it automatically stops due to server reboot then use cronjob and call the artisan from url .
Route::get('jobsWork', function () { Artisan::call('queue:work'); });

We are Vineet Maanas we are working as professional developers from the last 8 years and always looking to discover something amazing getting followed by market trends and always push new developers to learn something new with our tutorials Thankyou.
Leave Comment
Product and Services
 CLick for free trial
 CLick to avail offer


0 Comments (Please let us know your query)