Auth Guard in Laravel 10 , Make Model Authenticable in Laravel 10

Auth Guard in Laravel 10 , Make Model Authenticable in Laravel 10

08-Nov-2023
| |
Image Carousel

Hello Developes in this tutorial we will discuss about how you can make any table or any model authenticable using Auth::gaurd() .

Table of Contents

S.no Contents-topics
1 What is Auth::gaurd()
2 Creating Model & migration
3 Define model as authenticable
4 Define model in config/auth.php
5 Setting up login form
6 Authenticate with auth::guard

1:What is Auth::gaurd()

Auth::gaurd() is a beautiful feature based on OOPS provided by laravel which provide us to make any database table or any model autheticable property similar to User model , for eg working on big projects like multi-vendor E-Commerce where we have different roles of a user (admin , seller , customer) and different table as well , so there to provide autheticable property to seller similar to our user model Laravel provide us Auth::gaurd().

2:Creating Model & Migration

We are considering an example of Seller  user as table in database , so firstly we start by creating model and migration of Seller.
Code for model:Copy

php artisan make:model Seller -m

This will create a model  app\Models\Seller.php  and a migration file in database/migrations , now we will migrate our migration and then we setup our Seller model
code for migration : 
Copy

<?php
 
use Illuminate\Database\Migrations\Migration;
use Illuminate\Database\Schema\Blueprint;
use Illuminate\Support\Facades\Schema;
 
return new class extends Migration
{
    /**
     * Run the migrations.
     */
    public function up(): void
    {
        Schema::create('sellers', function (Blueprint $table) {
            $table->id();
            $table->String('name')->nullable();
            $table->String('email')->unique();
            $table->String('password')->nullable();
            $table->String('mobile')->nullable();
            $table->timestamps();
        });
    }
 
    /**
     * Reverse the migrations.
     */
    public function down(): void
    {
        Schema::dropIfExists('sellers');
    }
};

Now run the migration
migrate:Copy

php artisan migrate

3:Define model as authenticable

After migration we will move towards our model to provide same properties as the User model in app/Models/Seller.php model , so in seller model we are providing Authenticatable property and Notifiable is optional to add.
code for Seller model :
Copy

<?php
 
namespace App\Models;
 
use Illuminate\Database\Eloquent\Factories\HasFactory;
use Illuminate\Database\Eloquent\Model;
use Illuminate\Foundation\Auth\User as Authenticatable;
use Illuminate\Notifications\Notifiable;
 
class seller extends Authenticatable
{
    use Notifiable;
    use HasFactory;
 
    protected $guard = 'seller';
 
    protected $hidden = [
        'password',
    ];
   
    protected $fillable = [
        'name','mobile', 'email', 'password'
    ];
 
 
}

 4:Define model in config/auth.php

Now here is the main code comes where we define our Seller model as auth::guard() in config/auth.php , so basically in this auth.php we provide all our authenticable models or database table here.
code for config.auth.php: 
Copy

<?php
 
return [
 
    /*
    |--------------------------------------------------------------------------
    | Authentication Defaults
    |--------------------------------------------------------------------------
    |
    | This option controls the default authentication "guard" and password
    | reset options for your application. You may change these defaults
    | as required, but they're a perfect start for most applications.
    |
    */
 
    'defaults' => [
        'guard' => 'web',
        'passwords' => 'users',
    ],
 
    /*
    |--------------------------------------------------------------------------
    | Authentication Guards
    |--------------------------------------------------------------------------
    |
    | Next, you may define every authentication guard for your application.
    | Of course, a great default configuration has been defined for you
    | here which uses session storage and the Eloquent user provider.
    |
    | All authentication drivers have a user provider. This defines how the
    | users are actually retrieved out of your database or other storage
    | mechanisms used by this application to persist your user's data.
    |
    | Supported: "session"
    |
    */
 
    'guards' => [
        'web' => [
            'driver' => 'session',
            'provider' => 'users',
        ],
        'seller' => [
            'driver' => 'session',
            'provider' => 'sellers',
        ],
    ],
 
    /*
    |--------------------------------------------------------------------------
    | User Providers
    |--------------------------------------------------------------------------
    |
    | All authentication drivers have a user provider. This defines how the
    | users are actually retrieved out of your database or other storage
    | mechanisms used by this application to persist your user's data.
    |
    | If you have multiple user tables or models you may configure multiple
    | sources which represent each model / table. These sources may then
    | be assigned to any extra authentication guards you have defined.
    |
    | Supported: "database", "eloquent"
    |
    */
 
    'providers' => [
        'users' => [
            'driver' => 'eloquent',
            'model' => App\Models\User::class,
        ],
        'sellers' => [
            'driver' => 'eloquent',
            'model' => App\Models\seller::class,
        ],
 
        // 'users' => [
        //     'driver' => 'database',
        //     'table' => 'users',
        // ],
    ],
 
    /*
    |--------------------------------------------------------------------------
    | Resetting Passwords
    |--------------------------------------------------------------------------
    |
    | You may specify multiple password reset configurations if you have more
    | than one user table or model in the application and you want to have
    | separate password reset settings based on the specific user types.
    |
    | The expiry time is the number of minutes that each reset token will be
    | considered valid. This security feature keeps tokens short-lived so
    | they have less time to be guessed. You may change this as needed.
    |
    | The throttle setting is the number of seconds a user must wait before
    | generating more password reset tokens. This prevents the user from
    | quickly generating a very large amount of password reset tokens.
    |
    */
 
    'passwords' => [
        'users' => [
            'provider' => 'users',
            'table' => 'password_reset_tokens',
            'expire' => 60,
            'throttle' => 60,
        ],
    ],
 
    /*
    |--------------------------------------------------------------------------
    | Password Confirmation Timeout
    |--------------------------------------------------------------------------
    |
    | Here you may define the amount of seconds before a password confirmation
    | times out and the user is prompted to re-enter their password via the
    | confirmation screen. By default, the timeout lasts for three hours.
    |
    */
 
    'password_timeout' => 10800,
 
];

 5:Setting up login form

For checking our user authentication we will check with simple login form 

code for web.php Copy

<?php
 
use App\Http\Controllers\ManageUserController;
use Illuminate\Support\Facades\Route;
 
/*
|--------------------------------------------------------------------------
| Web Routes
|--------------------------------------------------------------------------
|
| Here is where you can register web routes for your application. These
| routes are loaded by the RouteServiceProvider and all of them will
| be assigned to the "web" middleware group. Make something great!
|
*/
 
Route::get('createUser', [ManageUserController::class, 'createUser']);
 
Route::get('checkUser', function () {
    return view('checkUser');
});
Route::post('checkLoginUser', [ManageUserController::class, 'checkLoginUser']);

code for chekUser.blade.php Copy

<!DOCTYPE html>
<html>
  <head>
    <title>Login Form</title>
    <meta charset="utf-8">
    <meta name="viewport" content="width=device-width, initial-scale=1">
    <link rel="stylesheet" href="https://maxcdn.bootstrapcdn.com/bootstrap/3.4.1/css/bootstrap.min.css">
    <script src="https://ajax.googleapis.com/ajax/libs/jquery/3.5.1/jquery.min.js"></script>
    <script src="https://maxcdn.bootstrapcdn.com/bootstrap/3.4.1/js/bootstrap.min.js"></script>
  </head>
  <body>
    <div class="container">
      <h2>Login Form</h2>
      <form action="{{url('checkLoginUser')}}" method="post">
        @csrf
        <div class="form-group">
          <label for="email">Email:</label>
          <input type="email" class="form-control" id="email" placeholder="Enter email" name="email">
        </div>
        <div class="form-group">
          <label for="pwd">Password:</label>
          <input type="password" class="form-control" id="pwd" placeholder="Enter password" name="password">
        </div>
       
        <button type="submit" class="btn btn-default">Submit</button>
      </form>
    </div>
  </body>
</html>

code for controller Copy

<?php
 
namespace App\Http\Controllers;
 
use App\Models\seller;
use App\Models\User;
use Illuminate\Http\Request;
use App\Traits\SaveFile;
use Illuminate\Support\Facades\Hash;
use Validator;
use Illuminate\Support\Facades\Auth;
 
class ManageUserController extends Controller
{
 
 
  function createUser()
  {
 
    $user = new User();
    $user->name = 'developer-corner';
    $user->email = 'user1224@gmail.com';
    $user->password = Hash::make('developer@123');
    $user->save();
 
    $user = new seller();
    $user->name = 'developer-corner';
    $user->email = 'seller1224@gmail.com';
    $user->password = Hash::make('developer@123');
    $user->save();
  }
 
  public function checkLoginUser(Request $request)
  {
    $validation = Validator::make($request->all(), [
      'email'   => 'required|string|email',
      'password' => 'required|string|min:6',
    ]);
 
    if ($validation->fails()) {
      print($validation->errors()->first()); die();
    }else{
      $credentials    = array('email' => $request->email, 'password' => $request->password);
      //   $user           = User::where('id_no', $idNo)->first();
 
      if (Auth::attempt($credentials, false)) {
          echo"<pre>";print('This is User');die();
      } elseif(Auth::guard('seller')->attempt($credentials, false)) {
        echo"<pre>";print('This is Seller');die();
      }else{
        echo"<pre>";print('Invalid User');die();
      }
    }
  }
}

As shown in Controller we are first creating our User and Seller with createUser() function and then we check if user exist in users table or sellers table.

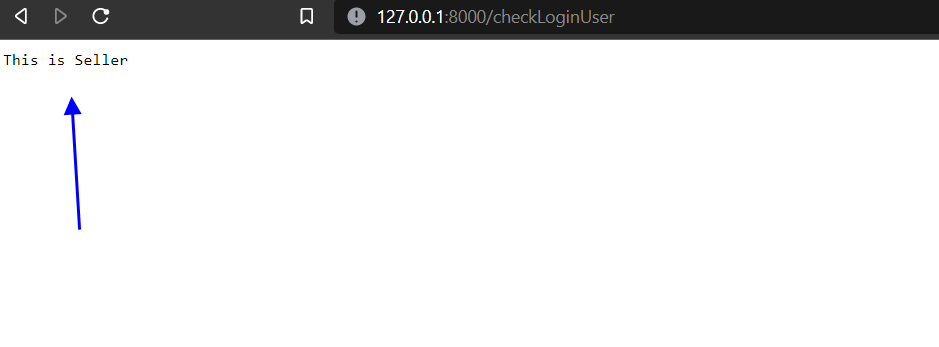
6:Authenticate with Auth::guard()

To autheticate Seller Auth::guard('seller')->attempt($credentials, false) whcih validate the credentials that we have send to the controller function and to check if Seller user if login or autheticate we simply use 
Auth::guard code :Copy

Auth::guard('seller')->user()


Tags: auth guard in laravel 10 , make model authenticable in laravel 10 , how to auth guard in laravel 10 , make model authenticable in laravel 10,laravel , php ,laravel-php , mvc laravel, advance laravel , bugs in laravel , laravel advance level,
0 Comments (Please let us know your query)
Leave Comment
Leave Comment
Articles from other Categories
Load More

Newsletter